Jump to
VIVO FRP bypass free guide for Android 14, 13, and 12 is finally here. This guide will help remove a previously submitted Google account from your VIVO device.
If you are facing the “Verify your account” screen on your Vivo smartphone and don’t remember the email ID and password of the previously added Google account.
Then you can use this free guide to bypass the Google account verification lock from your device easily.
However, the Factory Reset Protection (FRP) lock is a useful security feature. It protects the private data of the user even after removing the screen lock.
The only thing that protects the images, videos, contacts, documents, and other data of our device is the Password-protected screen lock. But what happens if someone removes that screen lock to access your private data?
Honestly, it is super easy to remove any screen lock. This includes the Password, Pattern, PIN lock, or fingerprint scanner.
Although this is a specific guide just for VIVO Android devices, if you want to apply the universal guide for bypassing Google lock, you can use the FRP bypass APK guide.
VIVO FRP Bypass Android 14, 13, and 12 in 2024
Currently, we are working with multiple methods to help authentic Android users who forget their Google account details.
On top of that, we are doing all this for completely free. Yes, that’s correct, you don’t have to pay for any subscription or paid FRP tools.
This step-by-step guide will help you to bypass the Google account lock from your VIVO mobile phone.
Follow Step-by-step Guide to Bypass FRP lock from VIVO Smartphone
1. Tap on the start button and then connect to a Wi-Fi network. Once you face the “Verify your account” screen, then go back to the “Hello!” welcome screen.

2. Now tap on the “Auxilary settings for reading” button from the welcome screen, then open TalkBack.
Turn on the TurnBack toggle.

3. Next, draw a big “L” on your screen, then double-tap on the “TalkBack Settings” option.
After that, open the “Braille Keyboard” settings.

4. Set up the braille keyboard and turn on the toggle of the “Talkback braille keyboard”.

5. After enabling the braille keyboard, keep pushing the back button until you reach the “TalkBack” screen.
Turn off the “Use TalkBack” toggle, and then go back to the welcome screen.

6. Push the next button, and now tap on the “Add new network” button and long push on the space button to open keyboard settings.

7. Now change the keyboard settings to Talkback Braille keyboard.
After that, push Turn on in accessibility settings, and open the Accessibility menu.

8. Enable the Accessibility menu shortcut > allow and push got it button.

9. Now tap on the accessibility menu shortcut icon, and then hit “Assistant”.
This will open the Google Assistant for you, now speak out and load “Open Settings”.

10. Inside the settings of your phone, go to the System > Phone Clone > and then agree to the EasyShare app terms.
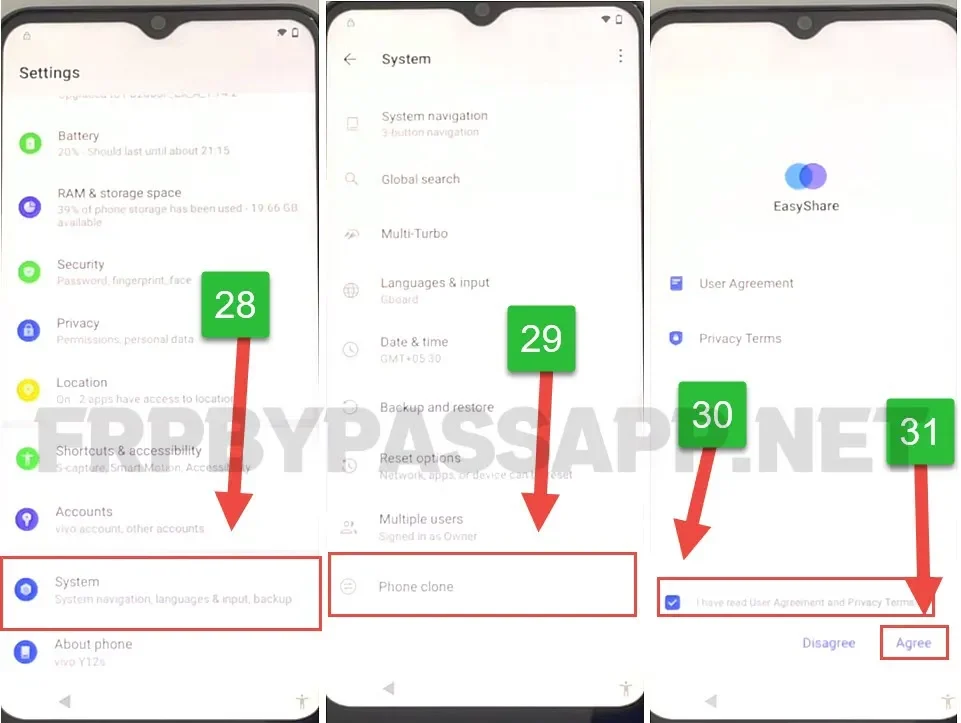
11. Select “New Phone” > then select Android as a phone type.

Now, this will open the QR code Scanner. Here we need to open the EasyShare app on a different phone to scan the QR Code.
We will connect 2 devices with the help of the EasyShare application.
Second Phone Steps:
Follow the below steps by using any working Android phone, as this will help us to transfer the application to the FRP locked device.
As we can not install the application directly to the FRP locked smartphone, this method allow us to easily transfer and use the Quick Shortcut Maker application.
1. Go to the Google Play Store on your 2nd phone, then download and open the EasyShare app.

2. Select “Phone Clone” and then tap on “This is an old device”.
Now it will show you the QR-Code, you need to scan this QR code to connect both devices.

3. Scan the QR Code of your FRP-locked device and then you will see “Connect successfully. Select data on another device”.

4. Now, go to the apps section inside your 2nd phone, and then select the “Quick Shortcut Maker” application.
Then tap OK > and hit the Next > button.

5. Within a few seconds, the QuickShortcutMaker App will be transferred to your FRP-locked device.
FRP Locked Device Steps:
1. Now go to the apps inside your FRP-locked phone, and here you will see the “QuickShortcutMaker” app.
Open this application.

2. After that, type and search for “Factory test” inside Quick Shortcut Maker.
Then select the result with “Factory test (Engineering test)” and hit the Try button.

3. After that, tap on the “Engeering t..” from the top bar and the select “Back TO Home” option.
Next, tap on the “Initialize to English” button.

4. This will simply redirect you to the Home Screen of your VIVO FRP-locked device.

We can easily use this method without removing our personal and important data.
Conclusion
In the last, I hope you have successfully bypassed the FRP lock from your VIVO device. However, if you are still facing any problems while using this free FRP unlock method, then feel free to comment down below.
